If you have been reading this blog then you already know that I can be all over the map with my projects. I like to be able to go back and forth between periods just to break things up. My armies get done slower but it keeps my interest up.
I spent some time working on one of the three warbands for my Rohan army for the September tournament. Since I'm unlikely to actually win the tournament through strength of arms I'm going for the painting win. This is an official GW tournament and as such there is straight forward checklist of items that a judge is looking for when he is judging the paint work on the armies. Conversions, even minor conversions, add huge points to your painting score, but there must be conversions on something like 90% of your army to get the check. With that in mind I'm working on doing at least some minor conversion work on every miniature that will make up the army.
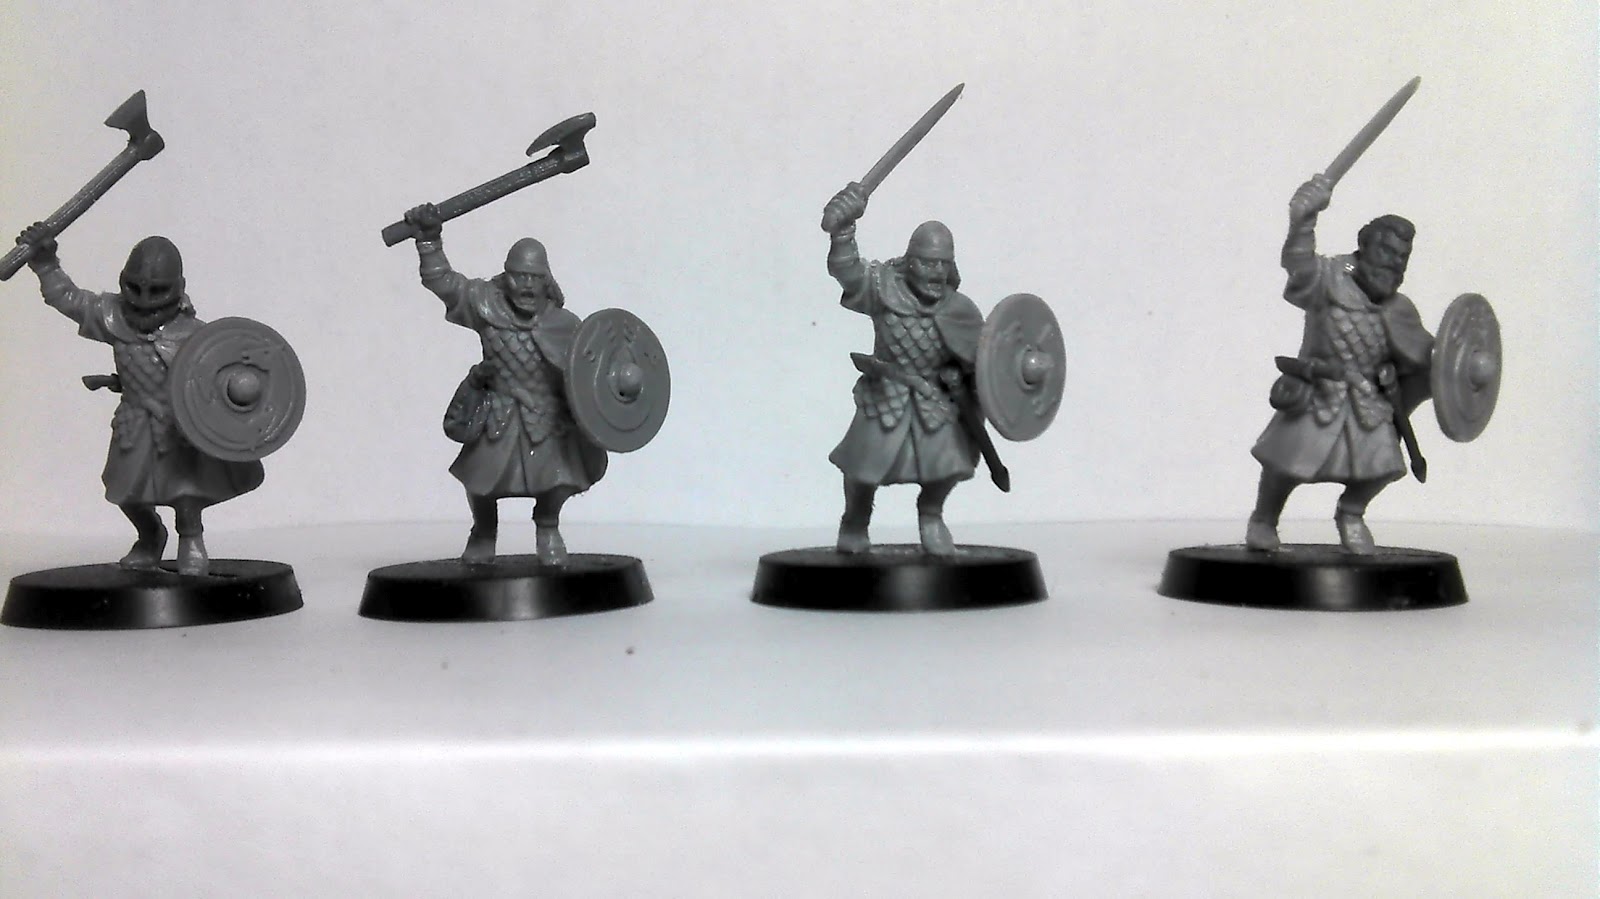
First up is Grimbold's warband made up of 12 Rohan Warriors. These are all plastics from the basic Rohan Warrior box. I'm trying to go very wysiwyg with these guys, so no throwing spears or bows, just shields and hand weapons and since the Helmingas prefer the axe to the sword I have swapped out weapons on half the miniatures. I sacrificed weapons and other interesting bits from a couple of sprues of Hirdmen from Gripping Beast and Bondi from Wargames Factory. I'm not sure I'm happy with all of the head swaps that I made. In particular the heads from the Gripping Beast sprues just seem to be to big, the ones from the Wargames Factory sprues look a bit closer to being the right size. Its a little difficult to use these heads to begin with since the GW LoTR figures are much closer to true 25mm miniatures and the Gripping Beast and Wargames Factory are definitely 28mm miniatures. They may look fine after I get them painted up but if I'm going to make any changes I need to do that now since I will need to resculpt the hair before painting them. Head swaps are usually the hardest thing to do but they really are a piece of cake with plastic miniatures. The same is true with weapons swaps and in this case I swapped out the whole hand, that was much easier than cutting weapons in two and grafting them on to existing hands. Everything else is just the addition of belt knives and pouches. Very minor stuff and very easy to do with plastic miniatures.
I have also run into a problem trying to acquire some of the miniatures for this force. A lot of the models particularly the mounted versions of the Rohan Royal Guard are out of production. My guess is that they will soon be available in Finecast resin. I don't want to wait that long or spend that much money on them either. I spent some time looking at images from the movie and determined that there isn't that much difference between the Royal Guard and any other Rohan warrior. The biggest difference is the helmet. Only the Royal Guard have a crest on the helmet with some horsehair flowing off of it. Two of the plastic Riders of Rohan have this style helmet (with the cheek guards). They will take more work but I'm going to use these two riders as the stock models for converting all ten of the mounted Royal Guard that I will need for Eomer's warband. I will probably do a little extra work on the horses to make them stand out a bit more as well as the horse in the Royal Guard blister is the same horse in the Riders of Rohan box.
Let me know what you think about the heads. Its definitely not to late to change things out and they are only plastic and I have another box to work with if something doesn't work. At this point the work is going smoothly and I'm on schedule to complete the painting in time for September.
Home » All post
DJoker's Face Tutorial

My friend Scott, just posted his version of my Face Tutorial over on his blog: http://djokergaming.wordpress.com/ . He does a few things differently but for the most part it is the same, but his has pictures! I think the variations are interesting and its well worth reading.
Posted
at 12:21 PM
Read more
Tutorial: Painting Faces

This is a tutorial I wrote about 3 years ago for my gaming group, LEG. Its really a step above a pure army painter style but its relatively quick and gives good results. And with that here we go:
I know there are a lot of steps here and it can look a bit intimidating but once you read it and work your way through it, it quickly becomes second nature.
How I Paint Faces
By Kris Marquardt
7/14/2009
Revised
3/12/2012
A quick tutorial on how I paint faces and eyes
The reality here is that there is nothing truly new in what I’m going to tell you, it is just my version of it. There are no new techniques, these are all things I have gleaned off the internet or been taught by other painters. What I’m really trying to achieve is to bring some of these techniques together in one place.
Suggested Colors
Basecoat - Leather Brown (Vallejo) or Mahogany Brown (Reaper Master)
First Skin Color - Tanned Shadow (Reaper Master)
Second Skin Color - Tanned Skin (Reaper Master)
Third Skin Color - Tanned Highlight (Reaper Master)
Wash - GW Sepia (devlan mud could work too, but I prefer something with more warmth to it)
Glaze - Red Leather (Vallejo) or Redstone Highlight (Reaper Master)
Eye 1st Color - Walnut Brown or Liner Brown (both Reaper Master)
Eye 2nd Color - Off white, light grey, anything that is close to white but not quite white
Eye Pupil - back to the 1st eye color
Basecoat - Leather Brown (Vallejo) or Mahogany Brown (Reaper Master)
First Skin Color - Tanned Shadow (Reaper Master)
Second Skin Color - Tanned Skin (Reaper Master)
Third Skin Color - Tanned Highlight (Reaper Master)
Wash - GW Sepia (devlan mud could work too, but I prefer something with more warmth to it)
Glaze - Red Leather (Vallejo) or Redstone Highlight (Reaper Master)
Eye 1st Color - Walnut Brown or Liner Brown (both Reaper Master)
Eye 2nd Color - Off white, light grey, anything that is close to white but not quite white
Eye Pupil - back to the 1st eye color
2012 Note: This is the original color list was what I was working with on a regular basis 3 years ago. At this point I rarely use the straight Reaper Tanned Skin Triad. I found that it is just to “cold” for the look I want. If I do use Tanned skin I will often mix it almost 50/50 with Reaper’s Rosy Skin or Golden Skin. My current preferred triad is the Reaper Bronze skin triad which again I rarely use without adding either Rosy or Golden to it. Everyone has a different idea of what they want their skin colors to look like so what’s important here is really the process more than the colors. Use what you are comfortable with. This is also not the process I use for my competition miniatures although it is derived from that. This is for gaming figures where we really need or want fairly sharp transitions so that the miniatures look good from our average 3’ distance on the table top. If I’m painting a small army with maybe 30 miniatures or so then I will step up and add more layers to soften transitions, closer to what I would do with a competition piece
I know there are a lot of steps here and it can look a bit intimidating but once you read it and work your way through it, it quickly becomes second nature.
Step 1- Base coat all the flesh. At this point I thin my paint at least 1:1 with water (or gunk in my case which is water + flow improver + drying retarder). It usually takes two coats to get the basecoat on. I prefer 2-3 thin coats as opposed to one straight from the bottle thicker coat. I use dark colors for this step since it will have an impact on the colors I use later on. Use darker browns for a cooler look, the Mahogany Red (or any deep brownish red) for a warmer look to the skin. Leather Brown and Mahogany Red are just a suggestions
Step 2 - After the base coat has dried, paint over it almost completely with the Tanned Shadow. Again I thin my paint down maybe quiet as much as 1:1 (paint:water) but you still want it thin. I'm going to stay out of the deeper recesses of the mini and leave those in the basecoat color.
Step 3 - At this stage I paint the eyes, if I screw up I know I have more painting to do and can neaten them up as I go. I paint the entire eye with a very dark brown or black (Reaper Walnut Brown is my favorite for this). Be sure you get all the way out to the edges. This is the shadow for the eye. Second step is to take an off white (linen white, very light grays etc) and paint essentially a strip across the eye. You want to cover the dark color with the off white leaving a dark line around the edges. This gives the eyes separation from the face and makes them stand out. I have thinned the white but not nearly at 1:1. Next are the pupils. Typically I use what ever I used to paint the first step in the eye, but any darker color will work, blues are good, some greens will work and deeper browns. Instead of trying to paint a dot I sort of push the tip of the brush up into to eye, so you are not seeing a full circle. Part of it is interrupted by the eyelid (which is normal, look at the people around you and you will see that you really don't see the entire circular pupil, part of it is hidden by the eyelid). It is easier to paint eyes that are looking off to one side. Getting both eyes straight looking straight ahead can be a bit frustrating. Now the eyes are done. NOTE: If the eyes are basically slits, let the wash fill it in, not every miniature has an eye that you can really paint and men in the field tend to squint anyway or the eyes are just plain hard to see if the shako, helmet or hat is pulled down low. So don't feel like you have to paint the eyes on every one of your miniatures. Just doing it for some of the guys in the front rank will make your stuff stand out.
Step 4 – Apply a wash across all the skin withSepia Wash (GW, wash, but any brown wash will work, warmer is better and if it has a hint of red even better) this warms the skin a bit. For a cooler skin tone Devlan Mud will work. Just be careful you don't wash over the eyes. Although a quick dab with a dry brush should wick out any of the wash that gets into a bad spot. The wash must be dry before you go to the next step or you will just start to create a muddy effect.
You can stop now if you like.
Step 5 - Using the Tanned Skin paint downwards across the skin. You are really painting the areas where more light is hitting, the cheek bones, the nose, the chin, the ears, the tops of the hands. Imagine the light coming straight down from the top of the figure to pick out these areas. Again, paint should be kept thin, not quite a 1:1 ratio but it should flow off your brush and remain controllable.
Again this is a good place to stop if you like it.
Step 6 - Using the Tanned Highlight hit the same areas but hit only the highest point. Again thin the paint 2-3:1
Again you can stop here, but usually if you have gone this far the next step will bring it all together
Step 7. - Glazing. One of the issues when you paint this many layers without a lot of intermediate steps is that it starts to look very blocky even chalky. So a glaze across the entire surface will help tie all the colors back together. A glaze has almost no paint in it so we are something on the order of 1:20 paint to water (so way thinner than a wash). If you put some on your brush and draw it across a piece of paper and if you can barely tell there is color on that line then you are about right. Apply the glaze across all the skin.
Step 2 - After the base coat has dried, paint over it almost completely with the Tanned Shadow. Again I thin my paint down maybe quiet as much as 1:1 (paint:water) but you still want it thin. I'm going to stay out of the deeper recesses of the mini and leave those in the basecoat color.
Step 3 - At this stage I paint the eyes, if I screw up I know I have more painting to do and can neaten them up as I go. I paint the entire eye with a very dark brown or black (Reaper Walnut Brown is my favorite for this). Be sure you get all the way out to the edges. This is the shadow for the eye. Second step is to take an off white (linen white, very light grays etc) and paint essentially a strip across the eye. You want to cover the dark color with the off white leaving a dark line around the edges. This gives the eyes separation from the face and makes them stand out. I have thinned the white but not nearly at 1:1. Next are the pupils. Typically I use what ever I used to paint the first step in the eye, but any darker color will work, blues are good, some greens will work and deeper browns. Instead of trying to paint a dot I sort of push the tip of the brush up into to eye, so you are not seeing a full circle. Part of it is interrupted by the eyelid (which is normal, look at the people around you and you will see that you really don't see the entire circular pupil, part of it is hidden by the eyelid). It is easier to paint eyes that are looking off to one side. Getting both eyes straight looking straight ahead can be a bit frustrating. Now the eyes are done. NOTE: If the eyes are basically slits, let the wash fill it in, not every miniature has an eye that you can really paint and men in the field tend to squint anyway or the eyes are just plain hard to see if the shako, helmet or hat is pulled down low. So don't feel like you have to paint the eyes on every one of your miniatures. Just doing it for some of the guys in the front rank will make your stuff stand out.
Step 4 – Apply a wash across all the skin with
You can stop now if you like.
Step 5 - Using the Tanned Skin paint downwards across the skin. You are really painting the areas where more light is hitting, the cheek bones, the nose, the chin, the ears, the tops of the hands. Imagine the light coming straight down from the top of the figure to pick out these areas. Again, paint should be kept thin, not quite a 1:1 ratio but it should flow off your brush and remain controllable.
Again this is a good place to stop if you like it.
Step 6 - Using the Tanned Highlight hit the same areas but hit only the highest point. Again thin the paint 2-3:1
Again you can stop here, but usually if you have gone this far the next step will bring it all together
Step 7. - Glazing. One of the issues when you paint this many layers without a lot of intermediate steps is that it starts to look very blocky even chalky. So a glaze across the entire surface will help tie all the colors back together. A glaze has almost no paint in it so we are something on the order of 1:20 paint to water (so way thinner than a wash). If you put some on your brush and draw it across a piece of paper and if you can barely tell there is color on that line then you are about right. Apply the glaze across all the skin.
Optional Step - You can glaze the skin after every application of skin color, not just wait till the last step. This will add a lot more depth to the skin tones when you are done. Since the glaze is applied over the whole surface you really won't add a lot of time by doing it. It does need to dry before you apply the next skin color though. If you are feeling really ambitious after the final glaze you could go back with the final hightlight color one more time and touch just the highpoints again. Some people like this affect some don't. The idea is to sort of add a "reflection" to the skin.
Done!
So this is one method, it’s the one I use most of the time. I do use a variation of this on my 15s but it’s really more appropriate for 25s and larger. There are other ways to do it and there is really not right or wrong as long as you get the effect you want and are happy in the end.
Posted
at 11:47 AM
Read more
Genghis Con XXXIII - Competition Pictures Posted
I finished working through the medal winning pictures of the competition miniatures from Genghis Con XXXIII. I have posted them on the CMPA Website http://www.cominipainters.com/gallery/
And a couple of pictures here

And a couple of pictures here
Posted
at 10:15 AM
Read more
Subscribe to:
Posts (Atom)