This is a pretty amazing image. This is a shot of the latest Mars Rover, name Curiosity, making its parachute descent. This was photographed by Mars Reconnaissance Orbiter, an incredibly lucky photograph. This rover uses a plutonium battery, it should easily exceed its two year mission parameter. You can go here for more shots of the event: Mars Rover Curiosity
Its really been an exciting year for space programs.
Home » All post
Reaper Miniatures Kickstarter - Bones
I don't do this very often but this is just to much of a good thing. Reaper Miniatures has developed a line of unpainted plastic miniatures they call Bones. I have played around with this stuff a little bit and its pretty amazing. Its a bendable white plastic that you can paint directly on to without priming. Don't thin your paints for this (or thin very little) step. After that its like painting any metal/resin miniature. The Bones line is pretty much coming directly from the metal Dark Heaven line (I do see a few miniatures coming from the Warlord Line in there) and there are even some new original sculpts as well. There seems to be little if any loss of detail between the metal and plastic versions.
This kickstarter is designed to get a lot of minis in production and expand the line quickly. Like any injected plastic the upfront costs for the molds are high but the production costs are quite low. Right now the sweet price point is the $100 Vampire level which includes 97 miniatures and there will be 102 if the next couple of stretch goals are met (which seems very likely at this point). Like a lot of kickstarter projects there are some optional extras; A pair of Fire Giants - $10, A pair of Frost Giants - $10, a Dragon for $10, they just revealed a big storage case today as part of one of the stretch goals for $25. If you are into fantasy miniatures and have the need for a bunch of different types as NPCs and Monsters then this one is well worth getting into. Go check it out at: Bones Kickstarter
Posted
at 2:15 PM
Read more
Brick Freight House - Starting the Build
The Brick Freight house is the first kit offering from Monster Model & Laserworks. I did a quick rundown through the components and quality last week and mentioned a few minor annoyances with the instructions. You can find that original post here: Test Fit
This weekend I decided to take a break from painting and gaming and get started on this kit. I grabbed my clamps and glue and took it north with me to start the fun.
As anticipated from the dry fit, the kit almost fell together. Well, maybe not fell together, the tabs and slots are pretty tight fits over all. As you will be able to tell from the photos you really can't have to many clamps and I made use of just about everything I had. At this stage the most difficult assembly turned out to be the roof. Since it has a border all the way around the edge this had to be lined up and clamped down with nothing to really line things up against. Then you have to very carefully separate the drainage grates from their sprue. That turned out to be the hardest part of the kit so far. You need 11 of these grates and there are 12 on the sprue. I only managed mangled one of them and that was when I was trying to pick it up to glue it onto the roof.
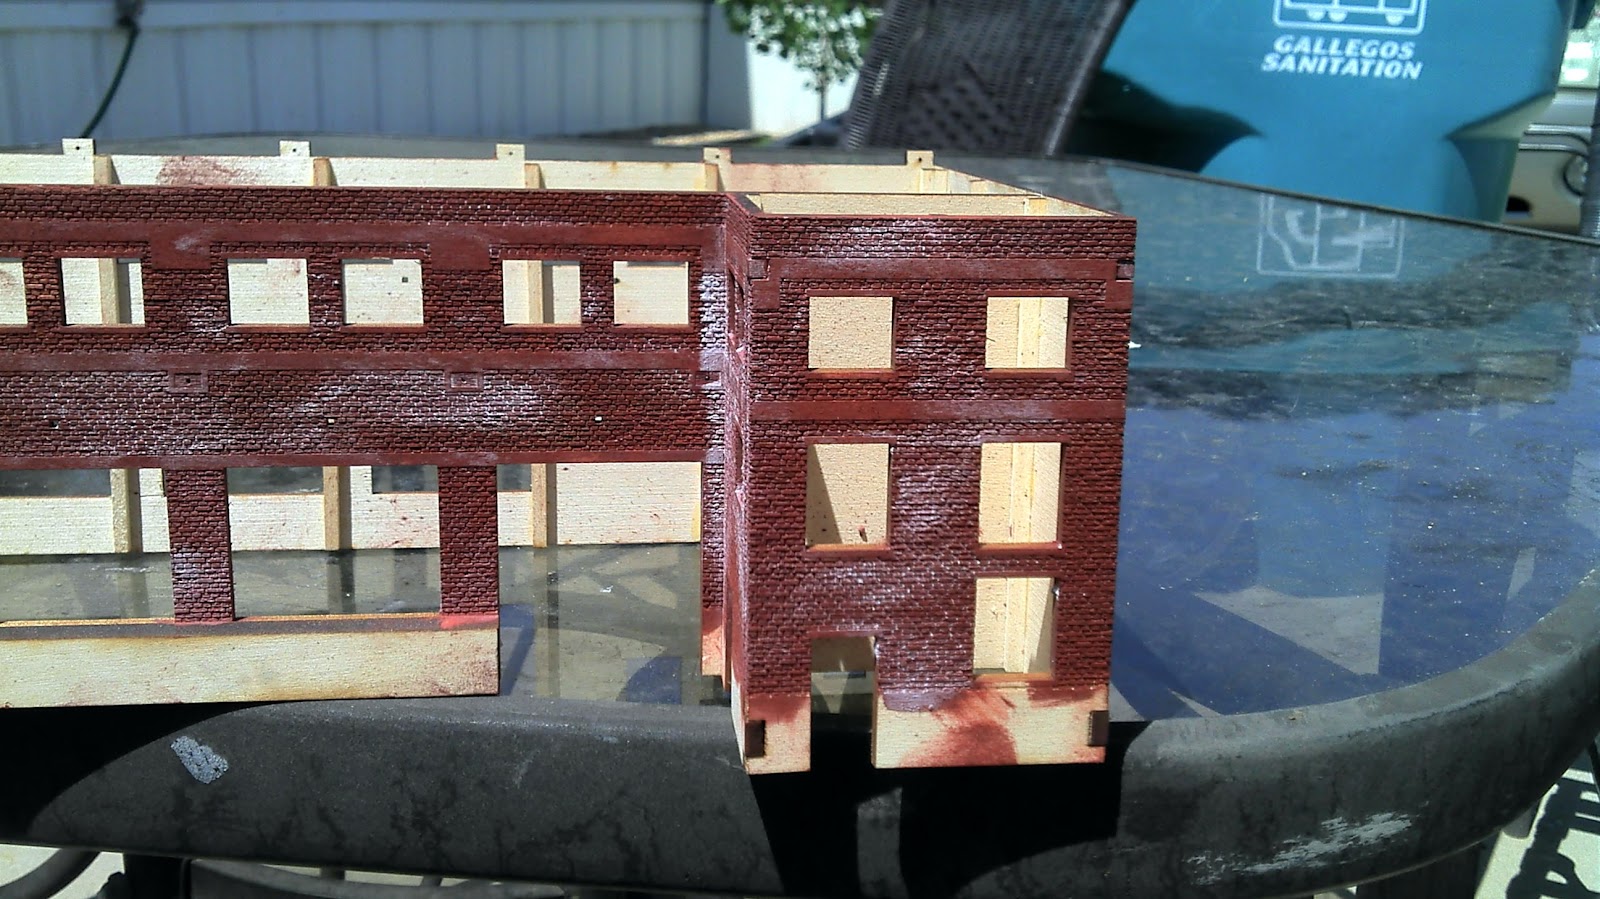
Some initial paint work was done at this stage as well. I followed the kit instructions for this and grabbed some of my MIG powders and 99% Isopropyl alcohol and went to work. Essentially you are mixing up your own paint and you need to lay it on thick enough to hide the grain of the wood. I think I managed that part pretty well. The next step is to apply a thick layer of dullcote and this is actually going to "frost" the brickwork to create the mortar lines. If the "frosted" effect is to much then you can dab the alcohol back on the surface to restore the color. I only managed to pull off the effect on a about a 1/3 of the model. I haven't gone back with pure alcohol yet to reduce the areas that are to frosted. I'm a bit undecided on how I will proceed with the painting at this point. I didn't have any black paint so the roof remained unpainted at this point. I need to build the optional clerestory for the roof before I go much farther with that anyway.
Over all I made good progress, moving at a moderate pace to make sure everything dried properly before moving on to the next. Fortunately, I live in a dry, high altitude climate and things tend to dry pretty quickly.
Now on to the pictures.
Not in any particular order but these pictures show the bracing being clamped into place.

Here's a quick test; dry fitting the roof to make sure everything is still square. It is!
My assortment of clamps. I used them all!
Lunch time!
And then a couple of hours for everything to set and the brushes come out.
Mmm, this seems to be working.
This weekend I decided to take a break from painting and gaming and get started on this kit. I grabbed my clamps and glue and took it north with me to start the fun.
As anticipated from the dry fit, the kit almost fell together. Well, maybe not fell together, the tabs and slots are pretty tight fits over all. As you will be able to tell from the photos you really can't have to many clamps and I made use of just about everything I had. At this stage the most difficult assembly turned out to be the roof. Since it has a border all the way around the edge this had to be lined up and clamped down with nothing to really line things up against. Then you have to very carefully separate the drainage grates from their sprue. That turned out to be the hardest part of the kit so far. You need 11 of these grates and there are 12 on the sprue. I only managed mangled one of them and that was when I was trying to pick it up to glue it onto the roof.
Some initial paint work was done at this stage as well. I followed the kit instructions for this and grabbed some of my MIG powders and 99% Isopropyl alcohol and went to work. Essentially you are mixing up your own paint and you need to lay it on thick enough to hide the grain of the wood. I think I managed that part pretty well. The next step is to apply a thick layer of dullcote and this is actually going to "frost" the brickwork to create the mortar lines. If the "frosted" effect is to much then you can dab the alcohol back on the surface to restore the color. I only managed to pull off the effect on a about a 1/3 of the model. I haven't gone back with pure alcohol yet to reduce the areas that are to frosted. I'm a bit undecided on how I will proceed with the painting at this point. I didn't have any black paint so the roof remained unpainted at this point. I need to build the optional clerestory for the roof before I go much farther with that anyway.
Over all I made good progress, moving at a moderate pace to make sure everything dried properly before moving on to the next. Fortunately, I live in a dry, high altitude climate and things tend to dry pretty quickly.
Now on to the pictures.
Not in any particular order but these pictures show the bracing being clamped into place.

Here the structure is being clamped together.
Here's a quick test; dry fitting the roof to make sure everything is still square. It is!
And the roof clamped up
Lunch time!
And then a couple of hours for everything to set and the brushes come out.
Mmm, this seems to be working.
And the next day after I have applied the dullcote. You can see the deliberate "frosting" effect. I wonder if this is a reaction between the alcohol and the lacquer based dullcote, but then why didn't it work over the entire building?
Posted
at 10:24 AM
Read more
Force on Force AAR - Russians vs Chechens
Managed to get my third Force on Force game in. Once again I get to play the irregular forces. On a positive note the Chechens are actually better than the Russian regulars that they are facing. Its still an asymmetrical battle though which puts my partner and I a bit behind the curve. Rob and I are playing against Kirk and Nick this time with Matt running the game. This is a playtest for Tacticon (coming up on Labor Day weekend) so there was a lot of ongoing discussion to make sure it was a good game for both sides.
Turn 1 goes very well for the Chechens as one of Rob's squads lights up a BMP with their RPG and took out a good chunk of the squad and the crew right away. The T80s split each slowly moving down the two main streets to the ministry of defense and the local government buildings. Russian return fire was pretty devastating taking out all but one of the Chechen defenders.
Turn 2 is kind of a stalemate with Chechen units using hot spot movement to shift positions. Two of these moves are key to slowing down the Russian advance. One squad manages a hot spot move into the corner of the streets threatening both the flank of the T80 and the advancing infantry trying to cross the street. Another hot spot move puts a Chechen squad behind the T80, which fires reactively doing considerable damage. The Chechen BMP 1 opens up with its Sagger ATGM on that T80 but misses. The T80's return fire fails to hit as well.
Turn 3 sees a lot of Russian firepower pouring into the Chechen squad at the corner and with the Chechen returning fire with the RPG at the T80 (as an irregular unit I can't split my fire so my choice is the T80's flank or advancing infantry. I go for the armor, probably a poor choice, and my RPG bounces off. Russian reinforcements start to arrive
Turn 4 sees much the same. Russian reinforcements start to whittle down the Chechens at the corner. BMPs and infantry pour in fire along with the T80 main gun and MGs. The T80 also misses a shot at the BMP again, while the BMP manages to score a hit and immobilize it. The other T80 continues down the street pretty much unimpeded at this point with the Chechen BRDM running for cover. Russian infantry assault the shaken Chechen squad and despite a serious advantage in numbers and firepower is wiped out by the shaken squad.
Turn 5 sees the T80 finally scoring a hit and destroying the Chechen BMP. The other T80 turns the corner and prepares to fire on the last Chechen squad, two RPGs hit it but fail to penetrate the frontal armor. Its return fire is ineffective. Chechen reinforcements finally arrive and fortunately show up in just the right place.
Turn 6 becomes the final turn as we have to clean up before the game can really end. A round of terribly ineffective fire sees more RPGs bounce off the T80s, including shots from the rear and against the top deck. We had a quite a bit of discussion on play balance on this one, it would have been nice to finish it off, but we had a good time with it.
At the start
Turn 1 Results

Turn 2

Turn 3
Turn 4 and Beyond

Turn 1 goes very well for the Chechens as one of Rob's squads lights up a BMP with their RPG and took out a good chunk of the squad and the crew right away. The T80s split each slowly moving down the two main streets to the ministry of defense and the local government buildings. Russian return fire was pretty devastating taking out all but one of the Chechen defenders.
Turn 2 is kind of a stalemate with Chechen units using hot spot movement to shift positions. Two of these moves are key to slowing down the Russian advance. One squad manages a hot spot move into the corner of the streets threatening both the flank of the T80 and the advancing infantry trying to cross the street. Another hot spot move puts a Chechen squad behind the T80, which fires reactively doing considerable damage. The Chechen BMP 1 opens up with its Sagger ATGM on that T80 but misses. The T80's return fire fails to hit as well.
Turn 3 sees a lot of Russian firepower pouring into the Chechen squad at the corner and with the Chechen returning fire with the RPG at the T80 (as an irregular unit I can't split my fire so my choice is the T80's flank or advancing infantry. I go for the armor, probably a poor choice, and my RPG bounces off. Russian reinforcements start to arrive
Turn 4 sees much the same. Russian reinforcements start to whittle down the Chechens at the corner. BMPs and infantry pour in fire along with the T80 main gun and MGs. The T80 also misses a shot at the BMP again, while the BMP manages to score a hit and immobilize it. The other T80 continues down the street pretty much unimpeded at this point with the Chechen BRDM running for cover. Russian infantry assault the shaken Chechen squad and despite a serious advantage in numbers and firepower is wiped out by the shaken squad.
Turn 5 sees the T80 finally scoring a hit and destroying the Chechen BMP. The other T80 turns the corner and prepares to fire on the last Chechen squad, two RPGs hit it but fail to penetrate the frontal armor. Its return fire is ineffective. Chechen reinforcements finally arrive and fortunately show up in just the right place.
Turn 6 becomes the final turn as we have to clean up before the game can really end. A round of terribly ineffective fire sees more RPGs bounce off the T80s, including shots from the rear and against the top deck. We had a quite a bit of discussion on play balance on this one, it would have been nice to finish it off, but we had a good time with it.
At the start
Turn 1 Results

Turn 2

Turn 3
Turn 4 and Beyond

Posted
at 10:29 PM
Read more
Subscribe to:
Posts (Atom)