Latest Updates

Poor Research Rant - The Switzerland Trail of America

Engine #30 of the Colorado and Northwestern Railway. She is cosmetically restored  but not to the original condition she  was in for the CNW. This is the final configuration she was in when working for her last employer as #74 for the Rio Grande Southern (RGS). Incidentally the RGS is the railroad that developed and built the seven Galloping Goose rail cars.

I was reading, with great interest, this morning about the City of Boulder sending Engine #30 and the rest of its rolling stock to the Colorado Railroad Museum for display. I was doing a little research on the Colorado and Northwestern's livery colors (Red, Light Blue and White not the prettiest colors by any means) when I stumbled across this. Now, I already knew the equipment had been moved since I had seen it there when I was at the Goosefest in 2012. What interested me was the pdf on the site that gave a brief summary of the history of Engine #30, the passenger car and the Rio Grande caboose. Then I read it and was appalled at the number of gross inaccuracies about Engine #30 (#74 on the Colorado and Southern and #74 on the Rio Grande Southern). I don't know who wrote it but I imagine it was an employee of the Boulder Parks and Recreation department. There is entire book (The Switzerland Trail of American, Forest Crossen) written about this railroad by a local resident and the last time I was at the Boulder library (something like 30 years ago granted), there were three second edition copies that could be checked out and three first edition copies in the rare books section. Even the information available on the net is more accurate than this abomination of a document! Okay, I feel better now.

Building Calamity - Weathering Update

This past weekend I sat down and applied the weathering techniques to about a dozen buildings. There were some successes and some lessons learned during this long session. First the original article that I consulted used Kilz as the primer, this is a very strong white primer. I ran into some issues with it where the water based fabric dye and the inks were actually repelled by the primer in spots. You can see this effect on in a number of the buildings, most notably on the railroad station, they look like little white blotches. It didn't happen on a consistent basis either, one building wouldn't give me any problems while another would drive me to frustration. I tried roughing up the surface before applying the fabric dye and that didn't seem to help. What worked in the end was rubbing in the first coat and sometimes subsequent coats in with my finger. I have no idea why but I'm not going to question it either. I think the problem may stem from to thick a coat of primer. The Kilz really comes out in quite a strong burst and you only want a light coat of primer on these buildings. My preferred priming technique (which I use for my miniatures as well) is to spray from right to left starting the spray of primer before I get to the building and not releasing until I have passed beyond the other edge of the building. This avoids a heavy coat of primer right at the leading and trailing edges.

Overall, I'm pretty pleased with the results. I'm going to go back in and fix the areas where I have the white splotch problem and darken up some areas that I feel came out to light. I haven't done much work on roofs at this point either. I love the wooden shingles from Builders in Scale but they are a bit expensive, so are the paper ones from Wild West Scale Model Builders. I downloaded some texture files from Clever Models that I can print out on my color printer and I would like to try those. In the long run I think printing my own will be cheaper, despite the cost of the ink! I purchased S Scale texture downloads for the roofs along with some other textures to be used on the inside, particularly for floors for the Knuckleduster and Gamecraft models. I probably won't work on these again, at least in any significant form, until after Genghis Con XXXIV which is coming up next week running from the 14th - 17th of February.

I took some pictures during the process over the weekend, but the light wasn't very good. I took some replacements the other day on my desk where the lighting is much, much better. At this point I can't get all the buildings lined up on the workbench, I'll have to find a place with better lighting and a table and try to lay out the town. I have been doing some sketching on what I want the boards to look like, but I haven't stumbled on anything that says "build me" yet.

On to the pictures!
Battle Flag - General Store and Gunsmith's Shop

Battle Flag - Saloon and Sheriff's Office. The Saloon is definitely lighter than the Sheriff's office, I think  I will go back and darken up the Saloon, Gunsmith and General store.

Battle Flag - Photographer's Studio, Undertaker's Building


Gamecraft Miniatures 

Old West One Story Building - 28MWEST006


Gamecraft Miniatures 

Old West One Story Building - 28MWEST006

Knuckleduster/Tri-City Laser Inc - Barbershop, General Store, Small  Shop

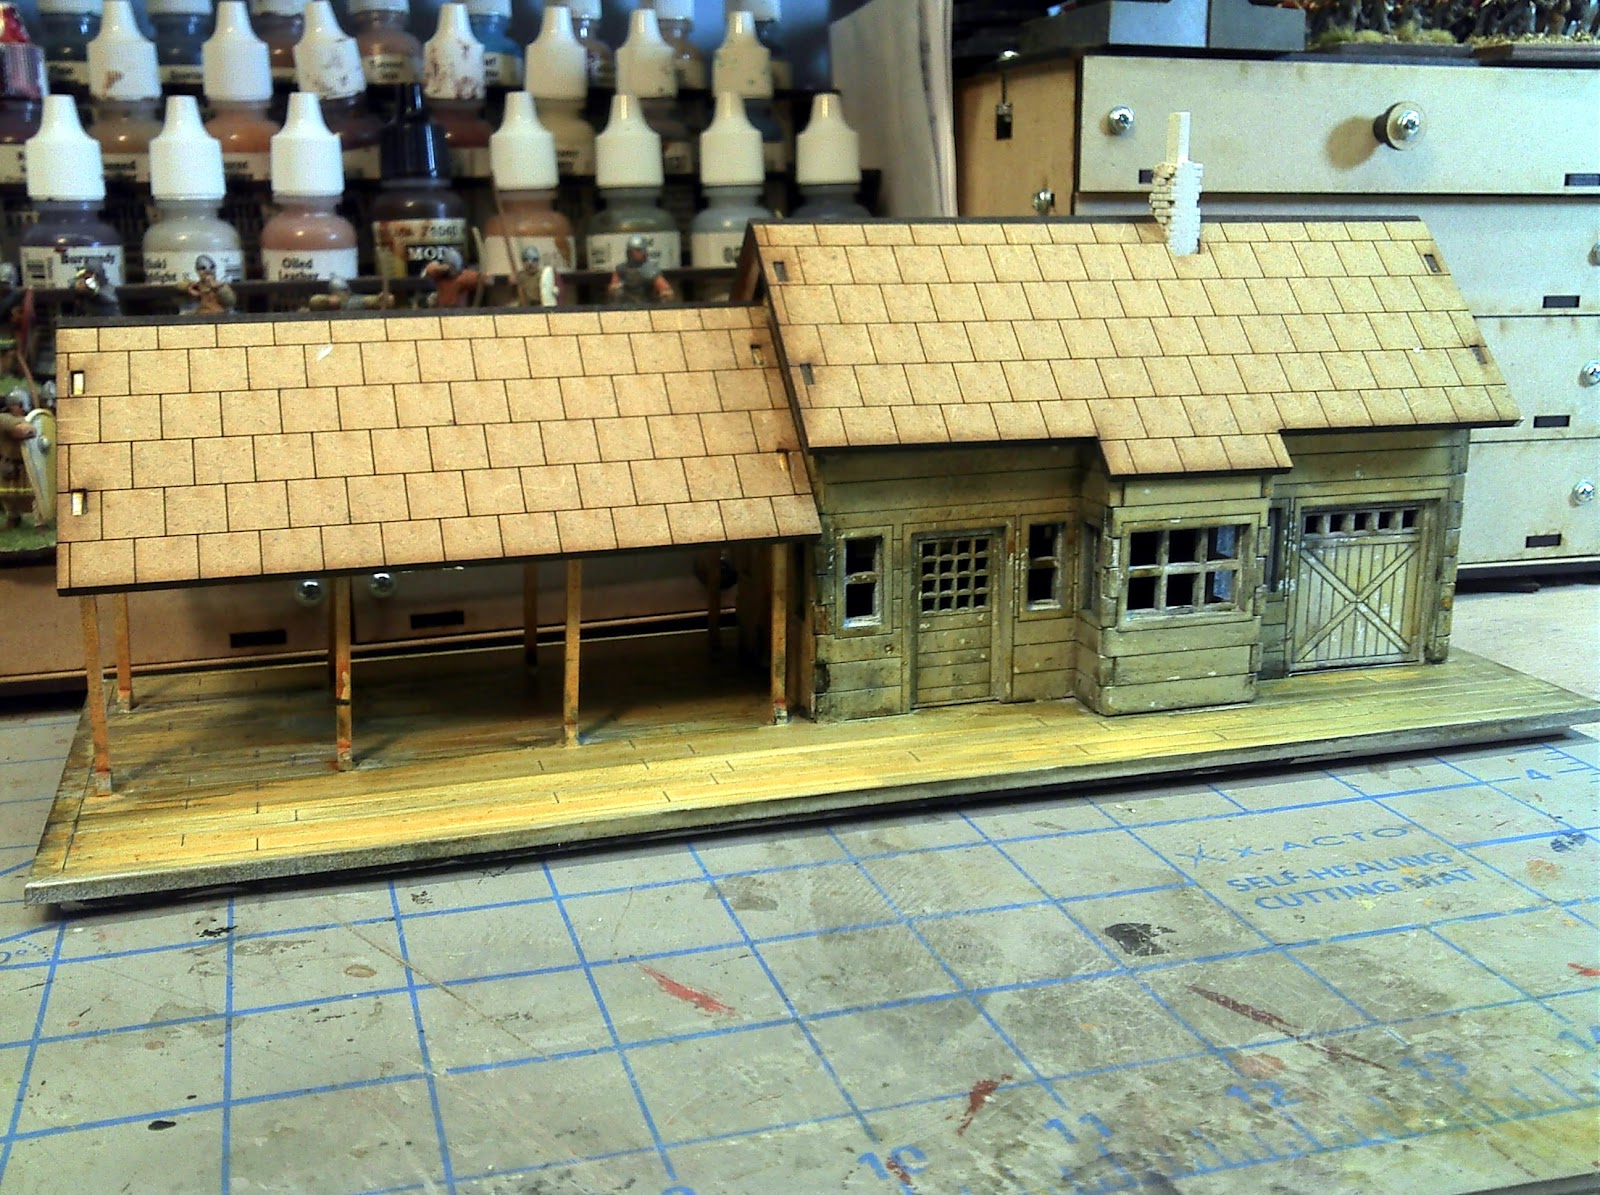
Sarissa Precision - Railroad Station, the white blotches are particularly evident on this building. I'll have to go back and fix that.

Sarissa Precision - Railroad Station, more white blotches and the freight door  is way to light and needs to be darkened.

Sarissa Precision - Railroad Station - shot of the platform
Sarissa Precision - Mix of  Small Heroic and Medium Heroic buildings . From the right, Small Heroic Plus, Small Heroic Plus, Medium Heroic and Small Heroic.


Building Calamity - The Tools

I have used a lot of different tools putting together the laser cut buildings that make up my Old West town of Calamity. First, I would like to emphasize that you don't need fancy tools to put these buildings together, some large rubber bands will do the job. Model railroad laser cut kits tend to be more complex and tools definitely help get those together. In general tools make some things easier, especially when it feels like you need four hands to get something together. If you like to scratch build your own structures some of these are downright invaluable. If you see a stock number, that's the stock number for that item from Micro-Mark

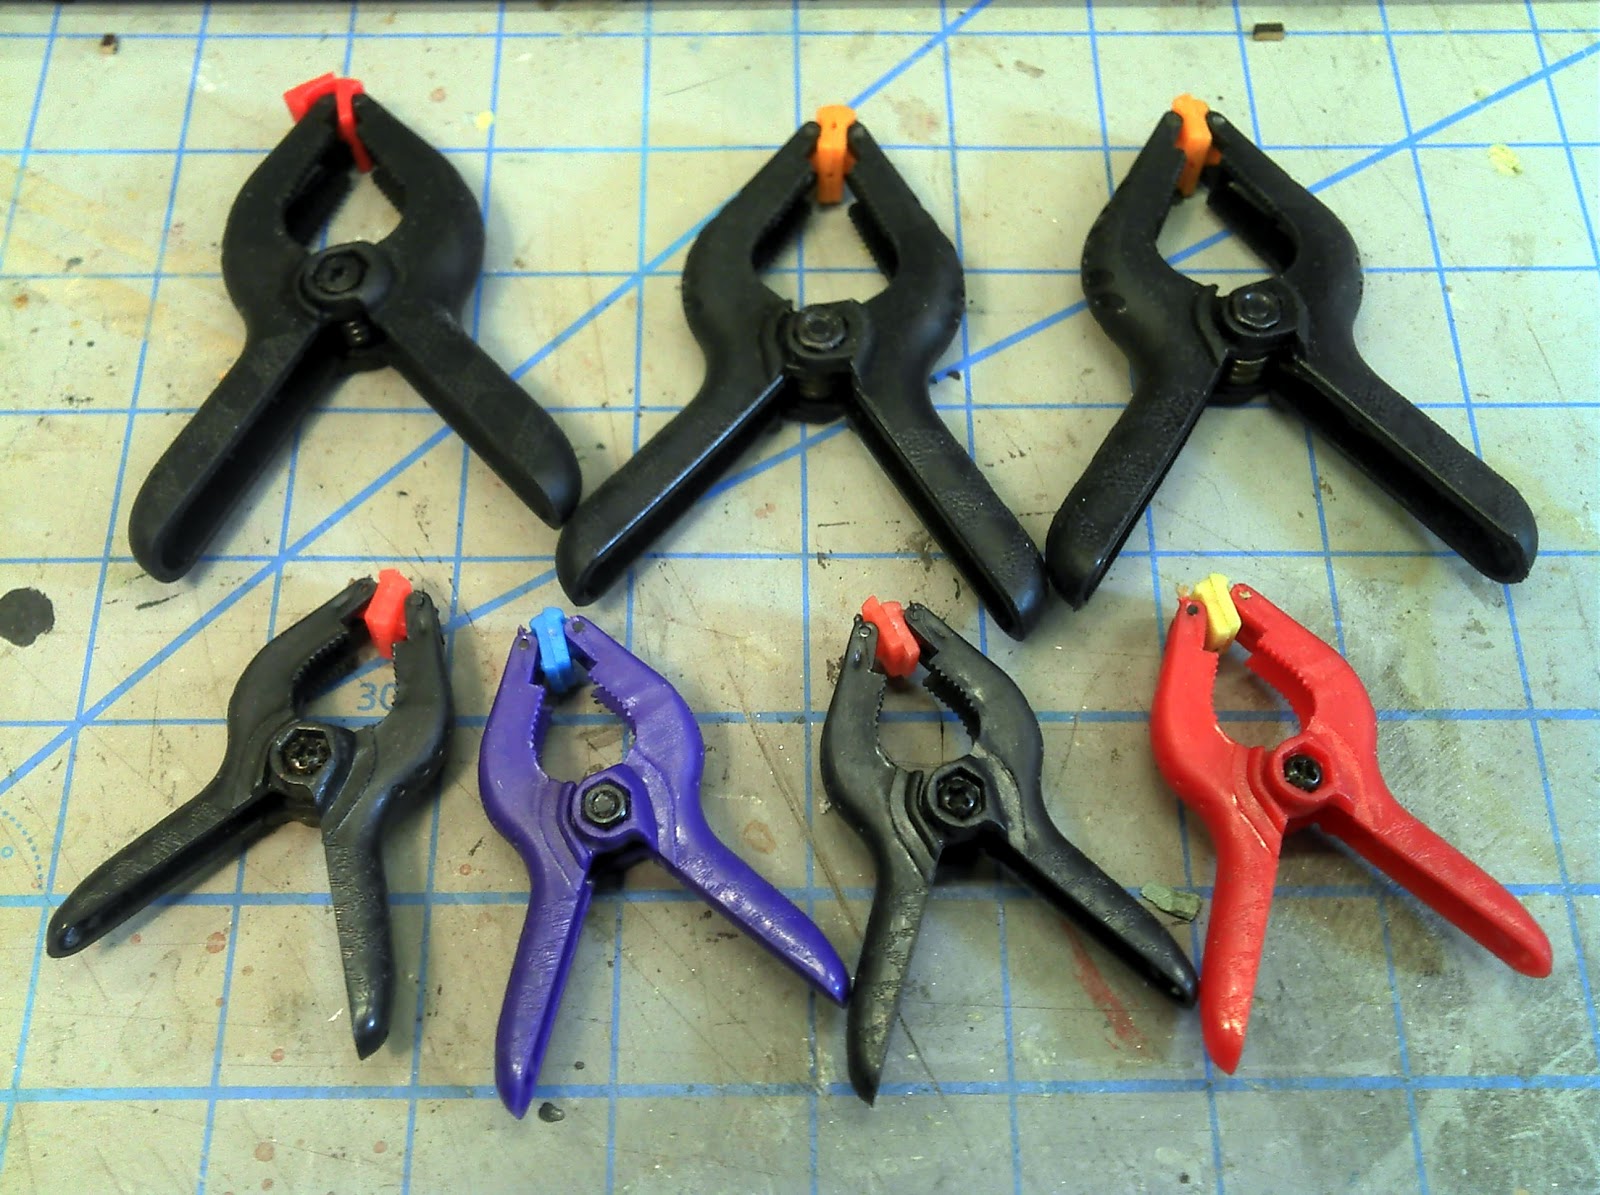
First up are the spring clamps. I have a bunch of spring clamps in a variety of sizes. I'm showing the two smallest clamps I have and the ones I use the most often. The small multi-colored clamps came from Micro-Mark. I bought the bucket of 50 (stock #82979) and there have been times when 50 hasn't been enough. The rest of my clamps I picked up at Home Depot can came in a nylon bag for like $7 (NIL 22-Piece Spring Clamps). There were 4 different sizes of clamps in the bag, the very largest I rarely use (at least for hobby use) but the other three sizes I use all the time. The smallest is the same size as the ones I bought from Micro-Mark and are a bit stronger. My own philosophy you can never have to many clamps.

The next clamp that I use quite frequently is the "right" clamp. This is used to clamp two pieces together that are at right angles to each other. The pair I have are probably close to 30 years old at this point and I have no idea who made them. Although I use these frequently they aren't particularly good clamps. There are better ones out on the market and I'm considering replacing the pair I have with something newer.

The clamp I really like, although it can be a bit fiddly, is the mini 4 corner clamp (#60716). It will go from 1/2" x 1/2" up to 4" x 5". Basically it wraps around a cube or rectangular building to pull the corners in tight and square for gluing. Its not possible to use this clamp in every situation but I use it whenever I can. Quite frankly though some rubber bands would do the same job just not as well since the rubber bands can't hold your object square.


While I'm talking about keeping things square here are some neat little 90 degree angle plates (#60713) that I picked up recently. These are 1"x1"x1" and I use them to keep parts vertical while glue sets. This is the smallest size that I could find.

The other way to keep larger items square while they dry is the magnetic jig (#60304). This consists of a steel tray with the edges turned up at 90 degrees. Then you use the magnets that are sandwiched between the plates to keep everything tight and square while the glue dries. These are powerful little magnets and it takes some effort to move them. I picked up the extra set of 8 magnets (#60305) and I'm quite glad I did, they have come in handy.

My last handy tool helps me keep things square and can be used to help weigh things down. These are 1-2-3 Precision blocks. I have an economy version which was just the blocks (#84644) and an ultra precision set that came with a case, screws and an allen wrench (I got these from Shars Tools). Apparently these are used to gauge things in some type of machining process. I use them to hold things in place (they weigh about 1 pound each), and since they are machined at precise 90 degree angles they can be used to hold things square as well.

Beyond that I use the regular assortment of modeling tools; x-acto knives, razor saws, pin vice and files. I prefer Titebond Carpenters glue  for the laser cut mdf and plywood kits. Super glue is not a good choice as the surfaces are so porous. Regular white glue or PVA will work just fine as well. And remember if you don't have these tools all of the laser cut mdf and plywood buildings will go together fine using just a few rubber bands to hold things together while the glue dries.


Calamity gets and Undercoat - Weathering Old West Buildings

I started this last weekend and discovered I didn't have all the materials and none of the local craft stores had what I needed. Fortunately Dick Blick ships quickly and I had the rest of my materials yesterday. I started with the Gamecraft Miniatures building last weekend to decide which fabric dye would work the best. I tried three brands of black; Rix, Scribbles and Dye-na-flow fabric paint. The Gamecraft building was primed with my airbrush using an acrylic primer ( I don't remember the brand). The fabric dye just didn't flow evenly across the surface and left a lot of streaks. Of the fabric dyes Scribbles and Dye-na-flow, are the best choices as they are actually black. The Rix comes out decidedly purple so I won't be using that one anymore. I picked up the fabric dyes at Joannes. The first pictures are of the Gamecraft building and I'm just unhappy with it, the back was done with the Rix dye and you can see how purple it is in the pictures.

Friday the inks arrived that I needed to pull off the effect. I purchased two different brands to try; Liquitex and Trans Mix Media Brilliant Ink (by Chartpak) from Dick Blick. I also primed the next two buildings with Kilz primer. I thought that the enamel surface would let everything flow a bit easier. I grabbed two Sarissa Small Heroic buildings for the next attempt.

I grabbed some big bottle gaps to serve as large palettes. The Scribbles dye comes out very thick so it needs to be cut down with water to create a wash. I had a cap each of Liquitex Burnt Sienna and Raw Sienna ready to go as well. The process works much better if everything is wet (well except the primer, that should be dry).

Pick a side to work on liberally apply the black fabric dye wash, as it dries this will give that nice silvery gray color for exposed wood. Your brush strokes should be in the same direction as the wood planks. While this is still wet apply a bit of raw sienna in places that are more protected, under the roof eves, under the windows any place where there is more protection. Use the burnt sienna (The Liquitex Burnt Sienna is really strong and you should probably cut it a bit with water) in the most protected locations. Feather the inks together with the same brush, then feather some black up into the area. You are going to create different tones in the wood this way. After the initial feathering I added a bit of raw sienna into the lower portions where I already had black. This gives a random look to the wood. For a newer building use more raw sienna, just keep in mind that exposed wood tends to weather very quickly especially in areas that see extremes in weather like Colorado.

Let everything dry a bit, you may need to go back with the black if it dries lighter than you would like. This is definitely a season to taste technique. This goes quickly, I did all three buildings inside of 30 minutes. This "undercoat" will serve two purposes. For the sides and backs of the buildings it will be the finished look. Paint was quite expensive in the Old West and typically only the front of a building would get painted, especially because of the boom and bust nature of small towns in the Old West. On the front of my buildings this will become the undercoat. When I reach the color stage I'll borrow a couple of other railroad techniques to create a peeling paint effect to expose this undercoat.

At this stage I'm pretty happy with the results so I'll move on to the rest of Calamity. Pictures will probably help explain what I was doing better than my writing so on to the snapshots!
1st attempts with the Fabric Dye.


Started with the Rix dye which ended up quite purple. Then went over it with the Scribbles brand. Now the whole back is really to dark. I might just paint this up as a rare building painted on all 4 sides. Or re-prime and try again.
Sarissa Precision Small Heroic Plus building. Primed with Kilz

Liquitex, Raw Sienna on the left, Burnt Sienna on the right.

Scribble, Black Fabric Dye

Scribble straight from the bottle, thicker than Vallejo! Add water to create a wash.
Apply black over the whole side. A bit of raw sienna higher up the side and under the window. Burnt Sienna on the very top board. You can see the different tones this creates.


Front of the Sarissa Small Heroic buildings, finished.

Back of the Sarissa Small Herioc buildings, finished.
Trying to save the Gamecraft Miniatures building. I think I can call this a sucess.

The back is still way to dark. Although it looks better in person. Maybe I'll just paint all four sides.


A small Calamity street shot

A small Calamity alley shot