Latest Updates
Showing posts with label Calamity. Show all posts

Tail End of the Train - C&N adds a Caboose

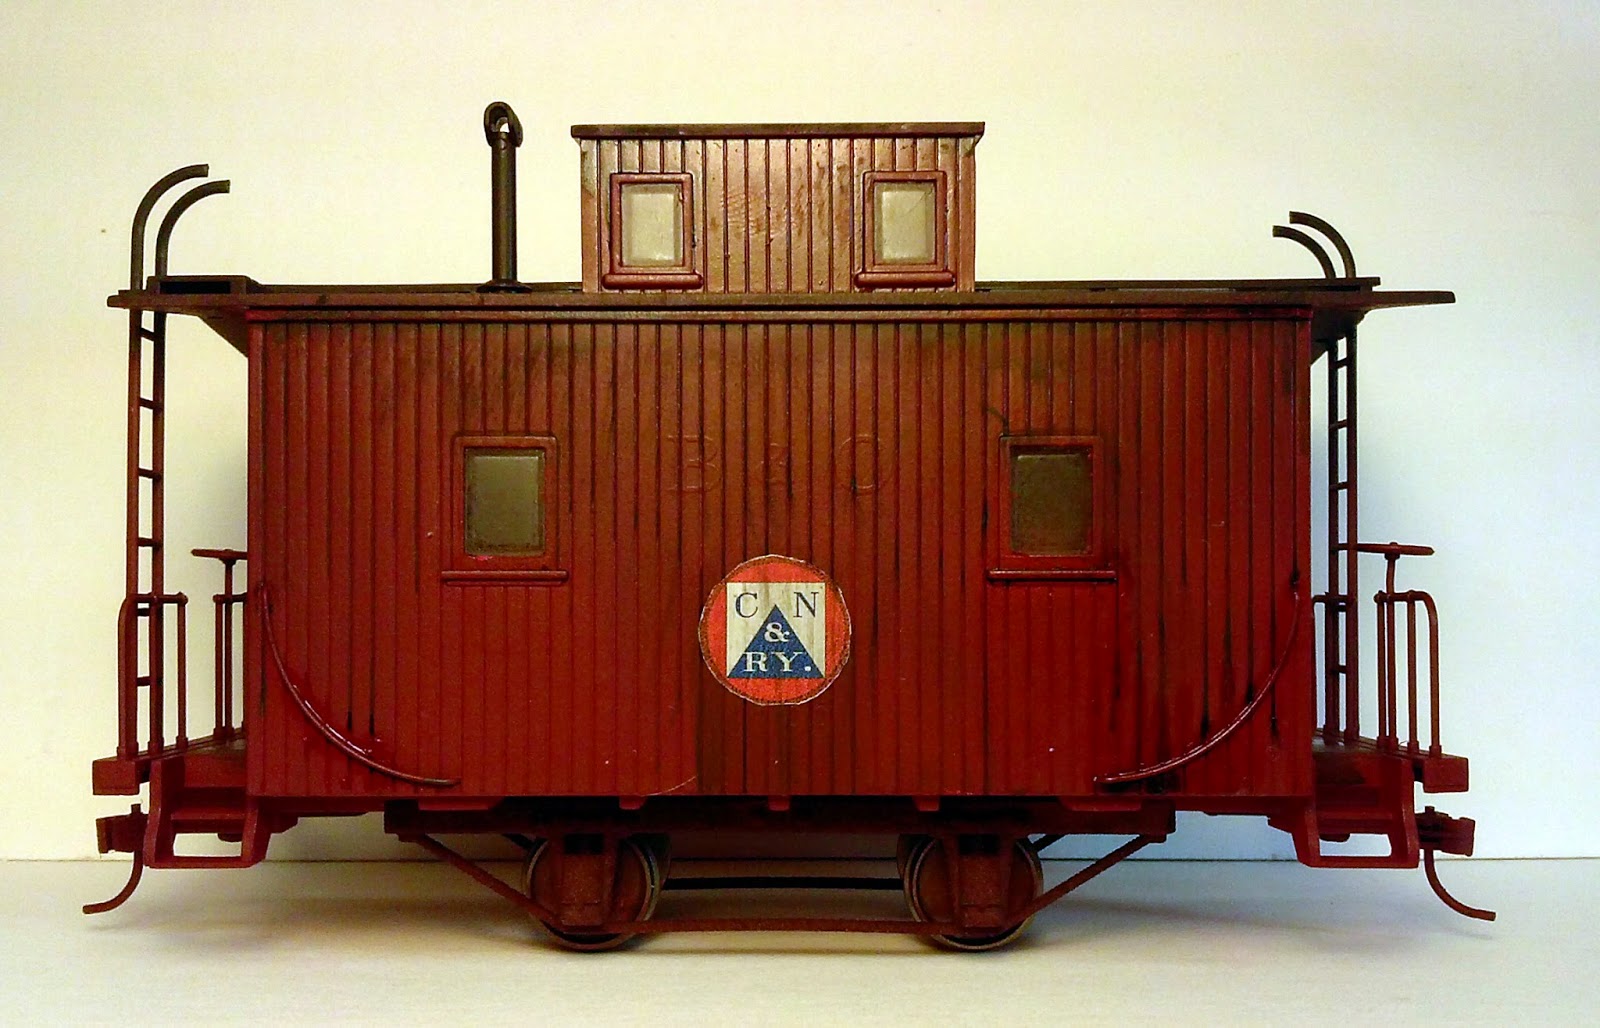
Bachmann makes a pretty generic caboose, unfortunately its an 8 wheel caboose and I really wanted a 4 wheel "bobber" caboose for the C&N to match the two that they had. At some point on eBay I stumbled on a 4 wheel setup and I bought 2. I have been a little reluctant to work with them as they seem to be a little fragile. I removed the regular trucks and mounted up the 4 wheel truck last night. Popped some wheels on there and I was done. I'm still not sure about the look so I'm going to go ahead and hold often converting my other caboose.

I had already airbrushed my chosen tru-color paint onto a bunch of freight cars including the cabooses. At this point I just added the two C&N logo decals and I was ready to go. I gave it a quick spray with the dullcoat and let it dry. I figured since I already had all my weathering stuff out I may as well work on weathering it up.

Its a little heavy and it looks patchy in the pictures but it looks okay when I hold it in my hand and give it the 2' test.

So the results of this evenings endeavors:

The base coat of paint was already on my intended victim

Added a decal to each side. The C&N didn't number their cabooses.


Applied the soot first, let it streak down the sides


Applied rust both with a prismacolor pencil and a rust effect paint


Applied the dirt, doesn't look this patchy or this heavy in person. I may have to go back over it and lighten the effect.

Little lighter on this side. Definitely need to get a brush in there and even the powder across the surface.

A Reefer for the C&N and Calamity

Believe it or not (and I know you model railroaders do) the refrigerator car did indeed exist in 1880. I managed to acquire one of Bachmann's privately owned Reefers on Ebay for a good price although not quite the one I really wanted but I am on a budget for these things. Its pretty pristine right out of the box so I decided to take an evening and do a little weathering. Not my best work but good enough is sometimes all I need. It at least looks like its been in the great outdoors for a bit.

Pictures always tell the story better than me so here we go:


The John Howard Refrigerator Car

A quick fade using thinned down Liquitex ink

Adding some soot, I think I over did it at this point

The other side

Adding some dirt to the bottom

Added some rust but overall not feeling good about it

Trying to get the soot to streak down between the boards

Happier with this now

The beauty shots


Calamity Gets a New RR Station - Part 10

The RR Station has been sitting off to the side of my work area for just over a month now with now progress, although it has served as a handy spot to set my decals on. If this was just a model for one of my train layouts (yes, plural) that would be one thing, but its a gaming piece and not even just a gaming piece but one of my "Hero" buildings. As such I need to be able to get to access the inside which means being able to get to both the first and second stories. With a regular structure this wouldn't be terribly difficult but the roof on this one is also a little complicated. I sat at my desk contemplating the second story and figured that I could at least start laying out where the interior walls could go.  As I contemplated this I realized that the whole second story could turn out to be rather flimsy so how could I fix that?

I decided that I would at least make some rafters and see if that would help the though process. I made these while watching Zulu (again!). Then I decided I could, at least, cut the interior walls for the two many rooms and see how that might fit together. Once I had the walls cut and kind of stacked everything together ideas finally started coming. I think that to add strength I'm going to only have half the roof come off. So I think I'm going to take the rafters and cut them roughly in half and permanently glue the bottom half to the interior walls and bottom edge of the floor. So far the clearances seem to indicate that it will work. There will probably only be a couple of the complete rafters included as fingers and minis need to be able to fit inside the building. Hopefully, this will get the process jump started again and I can get this building finished and off the workbench.


I have a couple of pictures from last night and since pictures are like bacon I figured I would include them.


The dilemma; There are no side walls, only roofs.

Well I need some rafters, here's one way to make sure the angles are good and add a bit of trim to the gable which helps finish it off.

Let's reinforce it so I can mess around with it a bit

I'm thinking so I think I make some more. They should be useful for something.

Well, I know I need some short interior walls.

And finally at work today, I may have figured it out. All except how to actually make that complex part where the two roofs come together.

First Decals - Not so Good

I tried out the decals that I made the other day. Overall not a success, I certainly learned a lot during the process. First trying to fill up 8 1/2" x 11" sheets was definitely not a bright move. I could have used a single sheet for the test instead of trying to go whole hog right out of the gate. So here is what I would do I differently:
1) Cut the decal paper down to 4"x6" sheets, photograph size. Plenty of room to print everything I needed to experiment instead of wasting a whole sheet.
2) Double check everything. While the logos look good the smaller versions ended up being elliptical rather than circular. It took me a bit to figure out why the looked a little funny.
3) Cut everything as close as you can to the edge. There is to much decal on the big Switzerland Trail logo.

I'm not sure I like this decal paper. Its suppose to snug down with lighter fluid but I wasn't really seeing that despite multiple applications of the lighter fluid. I was using Zippo, but maybe another brand would work better. The white definitely disappears when you put canola oil over it as stated in the instructions, but then you have oil on the car. Wiping it off seemed to work just fine, but it needs to be the very last step you do or it will start showing up white again.

The yellow lettering is to light and just disappears against the green car side so I'm not sure what to do about that. Other than being a bit elliptical the C&N logo actually looks pretty good. I think I'm going to look into how to work with white decal paper, but I don't want to have to apply individual letters and numbers to the car sides, that will take forever.
\So on to the pictures!

The Boxcar, not bad, but I need to do a lot better on the trimming and the color is to light. I need to darken it up so its a closer match to the car side's. Logo looks pretty good here.

The Coach car before the decals

The first decals have been applied, they definitely dry very white.

You can just make out the decals in place on the upper sill above the windows. I applied the canola oil and the white faded away.

And with the the logo applied. The logo looks good, but there is something wrong there. Oh, its not circular! Oops.
Now I just have to figure out how to do this better.

Airbrushing Freight Cars with Tru-Scale Paint

When I started this little project I figured I would just fall back on those old stand by railroad paints from Floquil. Well I haven't been paying attention and Testors, who bought Floquil, has discontinued them, in fact discontinued them some time ago. Not knowing much about the railroad paints available now I leaned on somebody that has been more involved than me, Darel from C&Sn3. He recommended Tru-Scale as the best replacement at this point. I went to Caboose Hobbies, who didn't have the color that Darel recommended, and I stood in front of the paint rack for 15 minutes and decided on TCP-139 MOPAC Boxcar Red. I then went looking around for information on how to shoot this paint through an airbrush. This is definitely airbrush paint and a bit on the expensive side at $4.99 for a one ounce bottle. I grabbed all three bottles Caboose had to make sure I had enough and for future additions to the C&N rolling stock roster. After reading up on it that may have been a mistake. Apparently Tru-Scale has a tendency to evaporate out of the bottle, probably because it has an acetone base. Which brings up the fact that this is a solvent based paint and when you shoot it through your airbrush be in a well ventilated area, or a use an airbrush booth and either way wear a mask, and not one of those little sanding masks.

So there is a lot of different information out there and a lot of it is not very informative. In fact I even saw one post that said that Tru-Scale didn't use pigment and that's why it didn't separate. Now that is possible as colors are either built from pigment or dyes, but generally anything called paint uses pigment (inks are dyes). Tru-Scale talks about pigment right on their website. So I combined the information I could find into something that, I hoped, would work for me. This paint is pretty thin already but it wouldn't go through my Infinity airbrush straight from the bottle. I pulled out some little graduated cups that I keep around and measured out three parts paint to one part acetone, that's right acetone as a paint thinner. I got lucky and hit the right combo off the bat and this 3:1 ratio worked like a charm.

Going into the booth were four boxcars, one stockcar, two flatcars, two short cabooses and one combine caboose. The C&N kept all its freight cars and cabooses the same color which means I don't have to switch out colors. Most of the prep consisted of removing trucks and in the case of the cabooses applying a liquid mask to all the windows. The cabooses I completely dissembled and removed the interior lighting components. They are actually quite nicely detailed on the inside, to bad you can't really see it through those small windows.

So two bottles of paint and 10 cars later I was finished, a pretty good days work. The cabooses will probably need some touch up. Its hard getting up underneath some of the overhangs and I found a thumbprint on the side of one so back to the booth for those, probably later this week. With the painting done this bunch is ready to see if these brand new decals I made are going to work. Pretty exciting stuff!

On to the pictures!


Three boxcars like this.

Fortunately only one in this ugly color

One stockcar

two flatcars

The reefer, although I reconsidered and left this one in yellow. I'll go back and do some decals in black for this one.

Disassembling a caboose. Removed the lighting and was surprised by the nice detail on the inside.

Easier to see the detail on the red interior as opposed to the black interior in the first caboose

Dissembling the second one, went much quicker this time.

The combine caboose, of course this one didn't come apart in quite the same way.

The interior, again some nice detail that you just can't see

Airbrushing complete! I left the stockcar with a black roof.

The cabooses and the flatcars.

Decals for the Colorado & Northwestern Railway, Calamity's railroad

I had so much fun weathering the D&RGW cars that I have been itching to get to the rest of the freight and passenger cars for my Colorado & Northwestern Railway. This time though I wanted to have the decals done before I started the weathering process (I'll have to go back and apply decals to the tank car and do a little extra work there). After checking out the options for custom decals I decided that I would be better off trying to do my own. Totally new experience for me. First I was going to need a lot of white numbers and letters. Without access to one of the famous ALPS printers I can't print white. Somewhere I read about a brand of decal paper that might do the trick (and yes I am aware that there are decals papers that are white instead of clear). This paper is from Evan Designs specifically designed for Inkjets and doesn't not require a fixative spray afterwards. So five sheets, $20 bucks not inexpensive but I ordered it and it arrived a few days later, quite a bit faster than I expected it to.

To work on the graphics I downloaded a free program called Inkscape. The learning curve wasn't bad and there are plenty of tutorials out there if you get stuck. Nice piece of software. There were a couple of miss steps but I managed to get things to come together. I also bought some railroad fonts from Ribbon Rail Productions that would at least be close to what the C&N used. Searching for fonts that were close was the most frustrating part. Railroads just didn't use standard fonts and modern fonts don't look right. Ribbon Rail helped a lot, while I didn't get perfect matches I got pretty close which is all I really could hope for. 

So I'm humming right along laying out lettering and numbers and recreating the logos when I realized that all the white numbers and letters still need a colored border. Arrgh, there goes an hour or so of work. Now I need to paint the freight cars and then scan the color to create a background for the white letters that will, hopefully, be close enough to the actual paint color to be easy to blend in during the weathering process.

I talked with Darel over at C&Sn3 and he recommended Rock Island Maroon from Tru-Scale Paint (TCP-260) as a good match for the C&N boxcar over at the Colorado Railroad Museum. A trip to Caboose Hobbies to obtain some paint only to discover that they didn't have the newest colors yet and the Rock Island Maroon is like brand new this year (actually I think Caboose hasn't been keeping up with the paint, the rack was kind of bare). I decided on MOPAC Boxcar Red (TCP-139). It ended up being a good choice and I'm pretty pleased with it. You can see how it looks in tomorrow's post.

So after maybe 10 hours of research, work and learning some new software I managed to create three, count them three, sheets of decals. I comfortable with the process though so making more should be easy enough.


Checking out the colors on the logos. The logo on the left has a "gold" rim, hard to see in this photo, and the central peak goes all the way to the top of the square. This is for the locomotive tenders. The smaller logo doesn't have the "gold" rim and the peak only goes up about 2/3rds of the way to the top. This is one is used on freight and passenger cars.

A test print of the yellow lettering that will go on the passenger, baggage and observation cars along with the yellow numbers. The black numbers are pretty much worthless, since they need to be in white! This was the point I realized that I really needed to get some painting done.

A test sheet on regular paper. Not bad just need to move it a bit to the right.

Three sheets of decals; logos in three different sizes, a sheet of letters and numbers and a sheet of car data and logos. The Switzerland Trail lettering is not prototypical. I wanted to add some interest to the car sides which are largely blank. Although the Colorado & Northwestern was pretty small as far as railroads its actually fairly well documented. The Switzerland Trail of America by Forrest Crossen is my main reference ( I have several copies) and this title appears on the cover of the book, so I scanned it in to put on the car sides. 
So there you have it, decals from your inkjet printer. Hopefully I get some time to try them out this week.

Calamity Gets a New RR Station - Part 9

I started to assembly the first floor of Calamity's railroad station over the weekend. Its been a rough assembly to say the least. Between dropping parts and breaking glue joints (learn to let the glue set!) I did finally manage to get the first floor together. I even remembered to put the raised floor in on the baggage/freight side of the building. Its still lacking some of the necessary interior details (like the two interior walls) but I think I'm going to take a break for a few days before getting to that.

Overall I'm pretty happy with the how the things are looking. I did not get the floor get exactly right but a little trimming combined with the exterior platform should hide those mistakes, that's what I'm hoping for anyway.

On to the construction photos!

So I approached this as four sub assemblies. This is the waiting room side.

Trackside Windows

Townside

Baggage room side

Corner clamps and blocks of steel

Trying to glue it to the floor! Those steel blocks weight 1# each or so

Waiting room side. I have had these corner clamps for about 35 years


Inside Trackside

Another view of the trackside window bay

Maybe that joint will hold this time

One of my small 90 degree angle blocks

One for each corner

I think they will hold now

Let's try getting that bay window together again

Something easier, the raised interior floor for the baggage room

And a little paint on the floor

Okay, maybe I'll try putting together the broken pieces directly to the floor

A little scale. I like the height of the modified S Scale door

Finally starting to come together

Just the trackside bay window left to go

Okay, it looks like its going to stay together, just going to anchor that corner to the table for a while

And clamp that corner

Looking good from the ground though

Town side

Yea, still missing the door to the baggage freight room.

Tracksdie


Looks pretty roomy in there without the walls

And a fuzzy shot showing the difference in height. And yes, those windows really are suppose to be there. The interior wall here will have door to the baggage/freight room, I'm guessing I should put a couple of steps up to the door to make things easier on the inhabitants