
Showing posts with label Review. Show all posts
Showing posts with label Review. Show all posts
Book Review - A Higher Call
I bought this book based on a passing remark that someone else made. I can't hardly recommend this book enough! This book pivots on the events of Dec 20th, 1943 as a crippled B-17 heads for home and is escorted over the coast by the pilot of a ME-109. This really isn't the central focus of the book though just the event that would eventually bring two WWII vets together. This is one of those rare books that I could not put down. It is primarily about the career of the ME-109. Starting and flying almost his entire career in the ME-109 and ending as part of JV-44 in ME-262s. This is book is something that is going to become increasingly rare, a story told by the veterans themselves. I don't really want to go into much here, this is a great book, just read it!
Five Buildings from Sarissa Precision
Close on the heals of my Battle Flag buildings came five kits from Sarissa Precision. They arrived safely this time! I picked up a couple of homestead style houses from their North American line as I felt that I was a little short on places for the citizens of Calamity to live. I also picked up the Railroad stations and two more regular Heroic buildings one small and one medium. The basic construction techniques I have developed are the same ones I used on these, so lots of clamps, Titebond carpenter's glue and a good sharp knife. If you are looking for buildings that look more like homes then definitely check out North American section of the Sarissa Precision website. All of these buildings are suitable for the Old West. I picked up the "House - Stone Chimney #1" and "House with Porch - Stone Chimney #1.
Sarissa has a lot of kits that no other company is making yet. They have a terrific line of Adobe style buildings which would be very useful for a southwest theme, along with the railroad station and all of the different homes in the North American line. If you are looking for the unique kit then you definitely need to check them out. They produce a high quality product with functional instructions (they could be better but are adequate to the task) that produces a good looking building for the table. Their buildings come with flat roofs as standard so if you want a pitched roof be sure you select that option. Unfortunately there is not an option for a pitched roof for their Heroic Large Buildings only for the small and medium Heroic buildings.
Because I have covered my construction methods in earlier posts I'll cut down on the number of construction photos to show you. I did have a number of problems with all of these builds to the point that I thought Sarissa had moved from 2mm MDF to 3mm MDF. I contacted Sarissa and Steve indicated that there is a tolerance in the material and sometimes it is thicker than 2mm. I checked mine this morning (perhaps I should have checked that when I was having problems!) and the MDF for all five of these buildings measures out at 2.5mm thickness. Doesn't sound like much but when everything is cut to such close tolerances that makes a huge difference. Steve offered to replace components if I needed them but since all five have been assembled it seemed pointless to get replacement components for them. Once I figured out that things seemed to thick I just filed down the spots where there is a tab that has to fit into a slot. The chimneys in both houses had to have the bottom cut off so it didn't extend below the floor, I don't think that had anything to do with the thickness of the MDF. I guess the moral of the story is check the thickness of the MDF before you start building so you will know what to do to make everything fit correctly.
Starting off with "House - Stone Chimney #1"
And now moving quickly on to build #2 "House with Porch - Stone Chimney #1"

Since I have built the stores from Sarissa before I decided to go for the train station next. These are among my favorite structures to build so I was really looking forward to this one. I have to admit that this is not my favorite kit. I don't think that it is very well designed and it certainly has some unprototypical features that really bother me. It also suffers from the fact that the tabs and slots required filing to get a good fit which also applies to the two interior walls which are harder to get into to file down because the exterior walls are fragile. If you force MDF hard enough it will break!
From here I moved on to the small heroic building (with optional pitched roof).
And then the final building; medium heroic with pitched roof (optional)
Sarissa has a lot of kits that no other company is making yet. They have a terrific line of Adobe style buildings which would be very useful for a southwest theme, along with the railroad station and all of the different homes in the North American line. If you are looking for the unique kit then you definitely need to check them out. They produce a high quality product with functional instructions (they could be better but are adequate to the task) that produces a good looking building for the table. Their buildings come with flat roofs as standard so if you want a pitched roof be sure you select that option. Unfortunately there is not an option for a pitched roof for their Heroic Large Buildings only for the small and medium Heroic buildings.
Because I have covered my construction methods in earlier posts I'll cut down on the number of construction photos to show you. I did have a number of problems with all of these builds to the point that I thought Sarissa had moved from 2mm MDF to 3mm MDF. I contacted Sarissa and Steve indicated that there is a tolerance in the material and sometimes it is thicker than 2mm. I checked mine this morning (perhaps I should have checked that when I was having problems!) and the MDF for all five of these buildings measures out at 2.5mm thickness. Doesn't sound like much but when everything is cut to such close tolerances that makes a huge difference. Steve offered to replace components if I needed them but since all five have been assembled it seemed pointless to get replacement components for them. Once I figured out that things seemed to thick I just filed down the spots where there is a tab that has to fit into a slot. The chimneys in both houses had to have the bottom cut off so it didn't extend below the floor, I don't think that had anything to do with the thickness of the MDF. I guess the moral of the story is check the thickness of the MDF before you start building so you will know what to do to make everything fit correctly.
Starting off with "House - Stone Chimney #1"
 |
| The Parts |
 |
| The Instruction sheet |
 |
| And here we are already finished up and with our favorite Huckster for scale I had problems with the getting the tabs on the roof to fit and you can see the result above where I broke off a portion of shingle next to the tab. |
 |
| And from the back. No fast exit here unless you go through the window. I had problems with getting the tabs on the walls to fit into the floor slots. I think they have changed from 2mm MDF to 3mm MDF and forgot to widen some of the slots to accept the new width. |
 |
| The Parts |
 |
| The Instructions |
 |
| The inside of the Chimney wall. If you look at the base of the chimney you can see where it extends below the tab for the floor. You can cut it right on the lines and it will fit. I'm not sure that its suppose to work that way but this gets it in place with almost no pain. |

 |
| Gluing the back wall shed in place |
 |
| Gluing in the front windows |
 |
| Test fitting the roof. I filed a bit off of both sides of the tabe as well as the slot they are suppose to fit into. |
 |
| The front with the roof in place. The two porch supports on either end are actually part of the sidewalls. This joint is fragile! I managed to break both of these ends off before I was done assembling the house. Fortunately they were pretty simple to glue back on. |
 |
| The finished house from the front |
 |
| And a figure for scale. I promise to paint another citizen of Calamity so she won't be so lonely. |
 |
| The Instructions |
 |
| Straight from the bag! |
 |
| Sorted out the parts |
 |
| Here is a wall sub assembly. If you click on the picture to see a bigger version you can see how I have filed down the tabs so that the will fit (I did front and back sides). The two long vertical slots make this piece a little fragile till you have it mounted on the platform. (this is the front wall) |
 |
| The back wall, again the tabs have been filed down (in width, not length)so they will fit into the platform slots. |
 |
| Walls mounted to the top of the platform. They served as a guide to gluing the bottom of the platform in place. The tabs actually are long enough to go through both pieces. |
 |
| The two interior walls slotted into place. I had problems with the front and broke some of the MDF but the break is hidden by the walls so not a big deal. |
 |
| And the back, or non-trackside. On most protoypes this wall would be flat and wouldn't have those wings around the door. (That's a prototype thing and not likely to bother your average gamer. |
 |
| gluing the door and window piece on to the exterior wall. |
 |
| Exterior walls in place and the frames for the passenger shelter roof are in place. These also had to be filed down to fit into the slots in the platform. |
 |
| The roof went together nicely. I did file the slots a bit and the slot for the chimney had to be filed as well. |
 |
| A look from the trackside. It looks good, despite my frustrations with getting this one built. |
 |
| A look from the street side. Looks good except that little alcove with the door is going to bother me. |
 |
| Passenger Shelter Scale Shot |
 |
| Building Scale Shot |
 |
| Instructions and Parts |
 |
| Sub Assemblies |
 |
| Gluing up the roof |
 |
| Using my clamps to square up the building and let the glue set |
 |
| Adding the other side to the roof. |
 |
| And the finished building. Fast build. I still had to file down all the tabs though to get them to fit. |
 |
| Finished from the back |
 |
| And a little scale shot. |
 |
| The Parts |
 |
| The Instruction sheet |
 |
| And the finished building. You do have to be careful with the front framing. The framing is all cut as one piece and the two larger windows snap off pretty easy and the whole thing is very floppy till you get it glued down in place. Fixing the window that broke off was very easy. |
 |
| The backside finished. Again I had to file down all the tabs that had to slot down into the base or upwards to hold the roof. |
 |
| And a scale shot. |
Trio of Old West Buildings - Battle Flag
I ordered three more Battle Flag buildings for Calamity at the end of December and I finally found some time to get them together. I really thought the detail on the first three that I built was really good (Saloon, General Store and Photographer's Studio), but the detail on these goes a notch higher. The window treatments on all three really stand out. They are all constructed from layering up 2 pieces of 1mm MDF to increase the level of detail. This applies to the shutters on the Gunsmith and Sheriff's office and the windows and front door on Undertaker's place. In fact the front door on the Undertaker's Building is layered up from three pieces of 1mm MDF. I really love this attention to detail. That's why I'll be making sure that the Battle Flag buildings will be the center of attention in Calamity. My concept for what I want the town of Calamity to be has grown from a simple gaming board to very much a display board. I still intend it to use it for gaming but I'm going to strive to bring the level of detail up way beyond your average convention game. I just hope my grand plans don't exceed my abilities.
Back to the Battle Flag buildings! Each building had its own dedicated instruction book and overall these are really good. I think some additional pictures for building the stairs for the Undertaker's building would help as I struggled with these just a little bit. Some larger pictures would be good too, my eyes are getting old! I didn't really have any problems with the way the pieces fit together although I would still recommend drying fitting everything together at least once to be sure you glue it together correctly the first time. I also experimented with gluing the walls together first and then fitting them to the base rather than following the instructions in the booklets. Overall this worked well for the Gunsmiths building, it worked okay for the Sheriff's office (the difficulty here is working around the odd shape of the building, and it worked pretty good on the Undertaker's place as well. It does feel like you need a third hand trying to do it this way though. If you have a couple of buildings to work on you might try it both ways to see how it works for you. The threaded clamp that I have fit on all three Battle Flag buildings and that went a long way in making my method work. (I purchased that clamp from Micro-Mark.)
I have cut down the number of construction pictures, if you really need to see how I clamp things together then you can check out my previous posts about the first three Battle Flag kits I built. You may notice that I acquired two more of the 2x3 blocks. Micro-Mark has been out of these for a while now but I found another source for them. These two are more precision than the first two and come with their own case as well as the bolts and hex nut wrench to actually screw them together.
I'll start off with the Gunsmith's Building. I decided on this building because of the shutters for the windows, I don't have any buildings with this feature and I wanted something that was a little different from everything else I have done.

Now on to the Sheriff's Office. Calamity will have both a Sheriff (local and elected by the residents) and a Marshal (Federal). I wanted the Sheriff's office because of the interesting shape of the building and, well, I need one. I haven't decided if Calamity's Sheriff will be a good guy or a bad guy yet.
And with that we move on to the Undertaker's place. I'm probably not going to use this for the undertaker its just way to fancy for such a dower individual. I'll see how things work out as the history of Calamity gets fleshed out.
That wraps up the Battle Flag construction project. The Battle Flag buildings are a bit more expensive than some of the other ones out there but I think they are certainly worth the money.
Back to the Battle Flag buildings! Each building had its own dedicated instruction book and overall these are really good. I think some additional pictures for building the stairs for the Undertaker's building would help as I struggled with these just a little bit. Some larger pictures would be good too, my eyes are getting old! I didn't really have any problems with the way the pieces fit together although I would still recommend drying fitting everything together at least once to be sure you glue it together correctly the first time. I also experimented with gluing the walls together first and then fitting them to the base rather than following the instructions in the booklets. Overall this worked well for the Gunsmiths building, it worked okay for the Sheriff's office (the difficulty here is working around the odd shape of the building, and it worked pretty good on the Undertaker's place as well. It does feel like you need a third hand trying to do it this way though. If you have a couple of buildings to work on you might try it both ways to see how it works for you. The threaded clamp that I have fit on all three Battle Flag buildings and that went a long way in making my method work. (I purchased that clamp from Micro-Mark.)
I have cut down the number of construction pictures, if you really need to see how I clamp things together then you can check out my previous posts about the first three Battle Flag kits I built. You may notice that I acquired two more of the 2x3 blocks. Micro-Mark has been out of these for a while now but I found another source for them. These two are more precision than the first two and come with their own case as well as the bolts and hex nut wrench to actually screw them together.
I'll start off with the Gunsmith's Building. I decided on this building because of the shutters for the windows, I don't have any buildings with this feature and I wanted something that was a little different from everything else I have done.
 |
| Building in a Bag |
 | ||
| The instruction book with an inadvertent shadow of me |
 |
| Three of the parts sheet, the 1mm MDF sheet is off to the side. |
 |
| Sub Assemblies ready to be glued together. |
 |
| A close up of the window frames with shutters. |
 |
| Sub Assemblies all finished. Sign is not glued on. |
 |
| Trying out the corner clamp. Works good! |
 |
| Gluing the structure to the base |
 |
| Add some weight to the floor while the glue dries. |
 |
| Back on the home workbench with real light! |

 |
| And our favorite huckster giving some sense of scale and style! |
 |
| The instruction book for the Sheriff's Office |
 |
| And a look at the parts |
 |
| Some of the sub assemblies |
 | |
| Walls are glued up and the floor is being weighted down. |
 |
| The Front side without the porch roof |
 |
| The back with a good look at the exterior of the jail cells. |
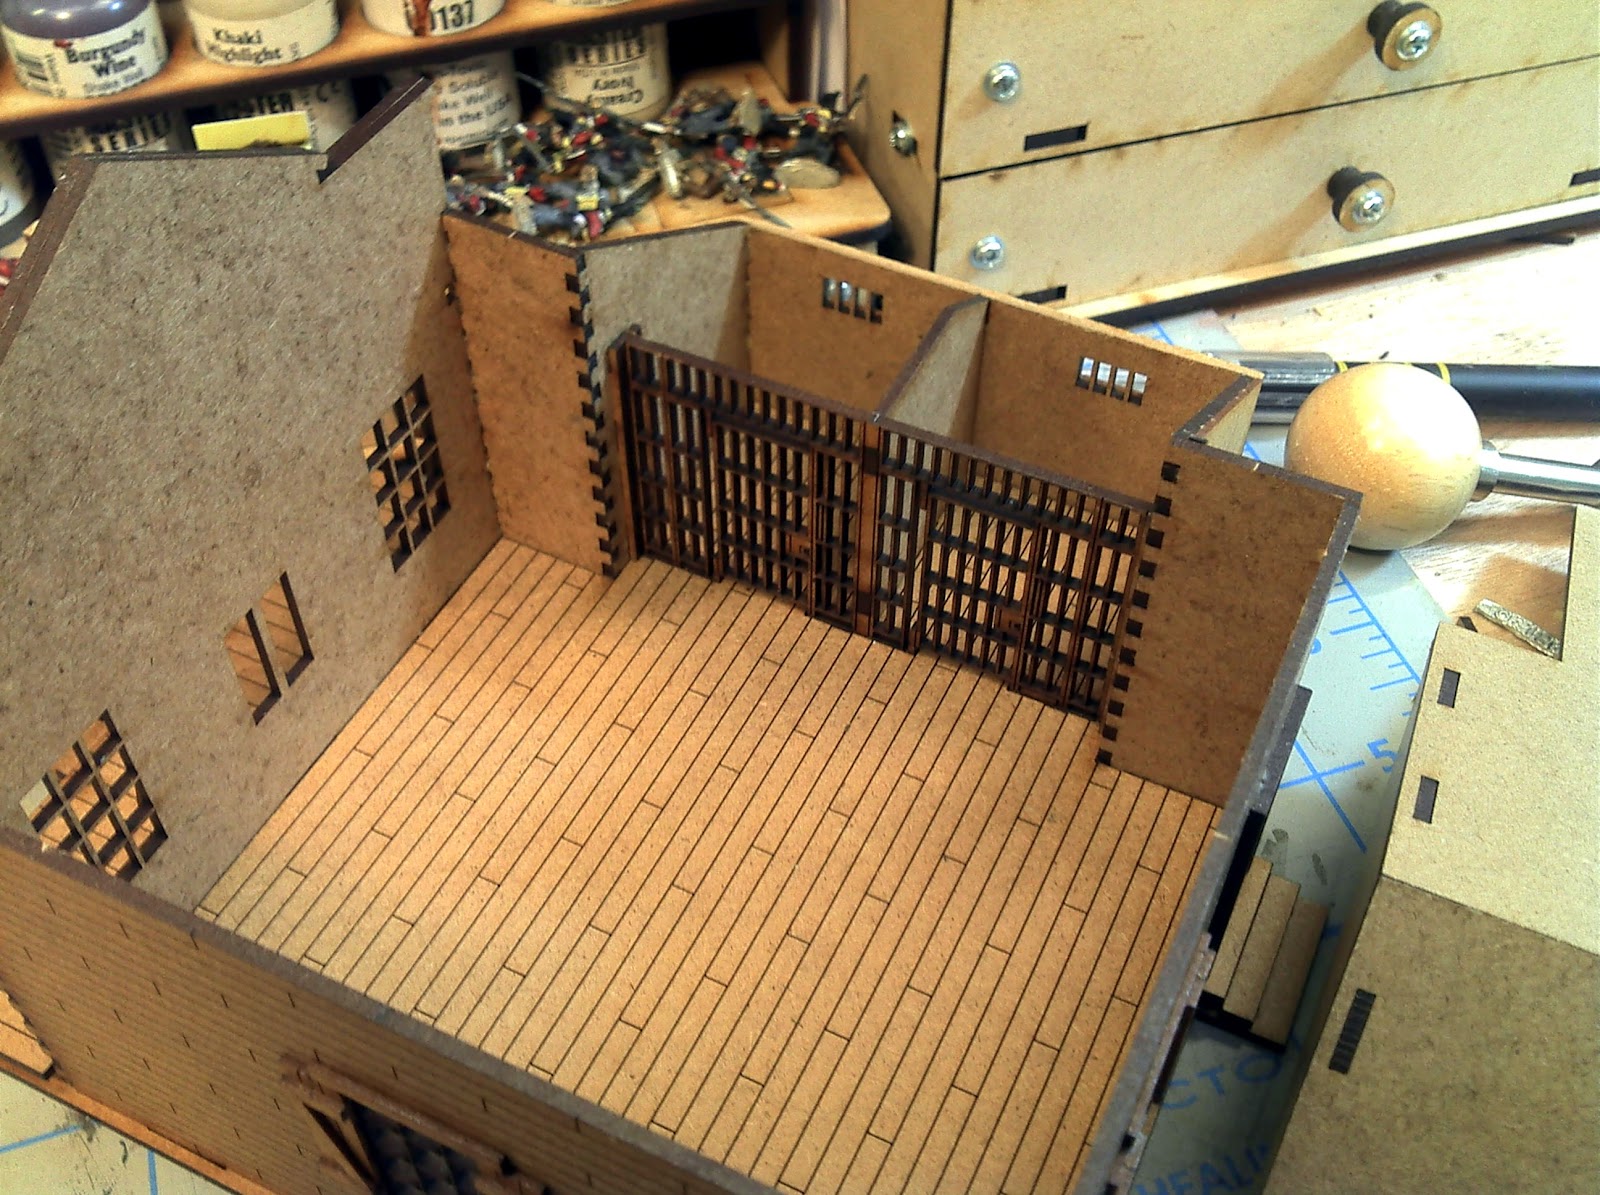 |
| The interior, check out the detail on the cell doors! |
 |
| With the porch roof in place. |
 |
| And our huckster staying out of the sun. At least she's not in the cell block! |
 |
| The Instruction book. Again I dedicated book my favorite kind! |
 |
| All the parts, there are a lot. I have already assembled the front door and the windows |
 |
| Sub Assemblies, note that only the front window and door are layered. All the rest are one piece. I do wish that the top left window on the back was placed a little further to the right. I'll have to cut my trim board to get it to fit. |
 |
| Applying a little weight to get the walls to set right on the base |
 |
| And a shot from the other side, the front board walk is being weighted down by a 1x2x3 block |
 |
| Its a long first step from that door on the second floor right now. |
 |
| Gluing up the stairs |
 |
| There is a landing now but its still a long first step |
 |
| This looks a little safer now! |
 |
| Checking out the line of sight! |
 |
| Interior supports for the second floor. |
 |
| And a scale shot. I really need to fix her base. |
Subscribe to:
Posts (Atom)


