Latest Updates

Calamity - Newspaper Office - Interior work

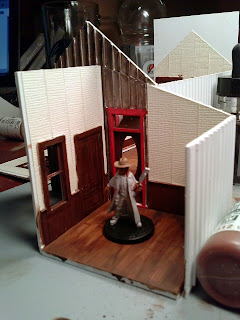
A bit more progress on Calamity's next building. I made a run to one of the craft stores and picked out some paper from the scrapbooking section that had some texture on it. The texture is probably a bit out of scale but its useful for this. I'm using this for wallpaper. I went to work and painted the wood first, which allowed me to be a little messy and then applied the wallpaper in strips. Now a real wall hanger wouldn't leave the seams that I did, that was deliberate on my part. I wanted more texture to draw the eye into the building. At this point I'm about ready to assemble the whole thing but that will have to wait till I can get back to my regular workbench and my clamps. There are still exterior details to finish off, like the top front and the backside of the false front plus I haven't cut out the roof pieces yet either. They shouldn't require much work since I'm just going to apply shingles directly to the plastic. I might add another interior wall to this one, I haven't quite decided yet. I need to decide before I assemble the building as I'll  have to make some adjustments on the interior side of the long walls. We will see. I have also toyed with lighting the interior, but I haven't found anything that I can really make into a light easily, plus I would have to figure out how to wire it. I can save that for another day.

Here are a few pictures of the progress so far:

Some dark wood color applied to anything that resembles wood on the inside. Since the top will be covered with wallpaper I can be messy here,


I decided to start applying the wallpaper to the walls of the addition first. Here is the first strip glued in place, I used Scotch Quick-Dry Adhesive for this.

Three strips applied and trimmed up.

Finished with the wallpaper in the addition

Finished with the wallpaper in the main room

The other side of the rear wall finished up.

Dry fitting the parts together to see how they look. Pretty pleased at this point. Didn't have any painted citizens with so this one had to do.


Cattle Cars for Calamity's Railroad

I'm always keeping an eye out for deals on rolling stock for Calamity's railroad. This week, in the after Christmas sales, I found a couple of cattle cars. At this point I'm pretty much just need boxcars. I wish I could figure out why Bachmann doesn't want to keep ordinary boxcars in production. The only ones currently available are $50+ each from a couple of other companies. The only ones available from Bachmann are some ventilated boxcars that I have no interest in. Hopefully I'll find some cheap ones at some point. Here are a couple of shots with the citizens of Calamity for a little scale check. I'm sure some nefarious plan is in the works since Dave "Mac" is on the scene with his ever present deck of cards.


Calamity - Newspaper Office - Doors and more!

Things are moving along quite nicely on the Newspaper Office for Calamity. I was able to stop by Caboose Hobbies today and picked out some doors. They are O Scale which goes okay with the Reaper and Black Scorpion miniatures they are a bit big for many of the other minis. However, after seeing some pictures from Bodie CA of people standing in front of a building and seeing just how big windows and doors could be I think I'm okay with it. The doors are cut in and glued in place and I finished off some of the interior detail. At this point all the interior needs is wallpaper and paint and then I can assembly the walls and finish off the exterior details and it should be ready for the table, well mostly ready for the table.

Three different doors

The back door

The original back door

The Front door

Exterior front door with some finishing details completed

The door to the addition

The original back door in place, more details to come

Interior wall with paneling and chair rail

The other interior wall with paneling and chair rail

Extra details added representing both the original exterior with board and batten contrasting with the paneling and chair rail.

Interior of the back wall

Interior Front Wall

Interior back wall of the addition.

Interior wall, door side, of the addition

Interior wall of the addition

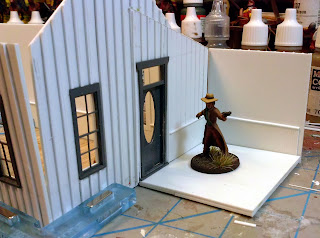
Using my magnetic clamps to dry fit everything together and a few citizens for scale


A nice overview of the whole building, more or less together. I'm thinking of a couple of different roof treatments, tar paper with battens for the addition and shingles for the main building.

Merry Christmas to All! Adding a Skiing Moose to the Season

I hope everyone is having a Merry Christmas! I had to make a gift for my father this year so I present to you the Moose Ski Instructor and his student this Christmas morning. Both of these started life as Christmas tree ornaments but I had a better idea.


Citizens of Calamity - Dance Hall Girl

This mini is from Wargames Foundry's Old West range. She came out of pack OW11/2. She is a pretty simple and it only took a couple of hours to finish her up mostly spent trying to get skintones right. I have been having problems with skin lately and it took a lot longer to get it mostly right. I'm not totally happy with her skin but she is gaming piece and sometimes its just good enough. I do like this color scheme though, I have to work to not use it to much. I think my tones may be a little to subtle and are getting washed out in the lights.


Calamity - Newspaper Office - Time for some glue

I had some time today so I pulled out the parts for Calamity's Newspaper office (or what ever it might become) and moved on to phase II. Today, I spent time gluing stuff together, well sort of together. In this phase the windows were all glued in place, the battens were added to the sides, the foundation boards were added and I built floors for both structures.

I typically use Evergreen Scale Models styrene plastic. Mostly because its a bit more readily available than Plastruct, but either will work. The biggest differences is that the dimensional pieces from Plastruct are shorter than those from Evergreen, the total amount in each package is about the same though. The battens were easy to glue down. I just applied a line of glue along the lines I had already drawn and added the batten on top. I didn't worry to much about them being straight, they tend to wander a bit off of center in the real world anyway. I did forget to leave a space for the door on the front of the shed so I'll have to cut through the battens there when I get the doors. I'm hoping to make a Caboose Hobbies run on Thursday for those.

Once I get the doors, I'll continue working on the inside of the building while the walls are still flat. I have already added some plastic filler pieces to the windows to level them up on the inside. Unfortunately I couldn't get the size I wanted in Evergreen plastic today and there wasn't a Plastruct rack available. I'll have to pick that up on Thursday as well. The interior will get a chair rail all the way around and all the doors and windows will get framed in. It would be a good idea and easier to add wallpaper at this point but we will see how much patience I have. I don't currently have access to a color printer although I do have a ton of wallpaper down loaded and ready to print. Wallpaper was very common and it was used as much for insulation as it was for decoration. The key to using it is making sure that you have it printed at an appropriate size. Most of the wallpaper that is available to be downloaded is scaled for dollhouses at 1/12 so its much to large for our purposes. You can find a ton of wallpaper here: Wallpaper

Here are some pictures of today's progress:

My favorite glue: Plastruct Plastic Weld (toxic version), some Evergreen .040x.040 pieces for the battens and the back wall of the newspaper office

Applying the battens. I like to glue on a number of pieces and then cut them off afterwards. Evergreen does make board and batten siding but its much to regular in appearance for my taste.

One side finished including the foundation board

The other side finished. You can definitely see that some of the battens are not very straight!

The floor. I re-thought how I should have scribed the planks after I was finished. Another measure twice, cut once situation. I went ahead and work some raw umber into the planks so I could see the planks, the scribes and the wood grain. I ran a piece of 60 grit sandpaper across the floorboards to make the grain, quick, easy and looks pretty good.

The back wall of the Office plus the addition. The battens don't go all the way down where the addition will be glued.

Here is what the addition will look from the front. If you look really close you can see the filler plastic I used to make the windows level with the wall.

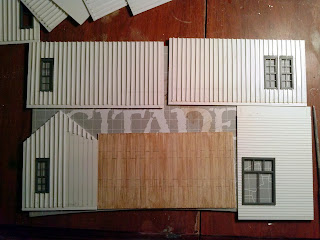
Pieces for the main building

Pieces for the addition. I still need to acquire three doors and cut out their positions. Now that I think about it I could go ahead and add planking to the inside of the walls. I'm envisioning this mostly as living quarters for whoever owns the building. Pretty normal way to do things in the old west.